When I first heard “Food art, Appetizer dips, Art carved: How 1 Dip Wows!”, my mind immediately conjured up images of intricate culinary sculptures. But what truly makes this recipe stand out is its ability to elevate a simple dip into something genuinely spectacular, proving that edible art isn’t just for professional chefs. It’s for anyone who wants to bring a touch of magic to their table without spending hours in the kitchen, making it perfect for those moments you want to impress without the stress.
Why You’ll Love This Dish
This isn’t just another dip; it’s a conversation starter disguised as an appetizer. You’ll adore it because it effortlessly combines the visual delight of food art with the crowd-pleasing appeal of a delicious dip. Imagine serving something so elegant and eye-catching, yet so deceptively simple to prepare. It’s fantastic for special occasions like holiday gatherings, celebratory dinners, or even just a fancy Friday night in.
> “I made this for a recent dinner party, and my guests couldn’t stop talking about it! It looked incredibly impressive, but the flavor was even better. Definitely a new go-to for entertaining.” – A Happy Host
The Cooking Process Explained
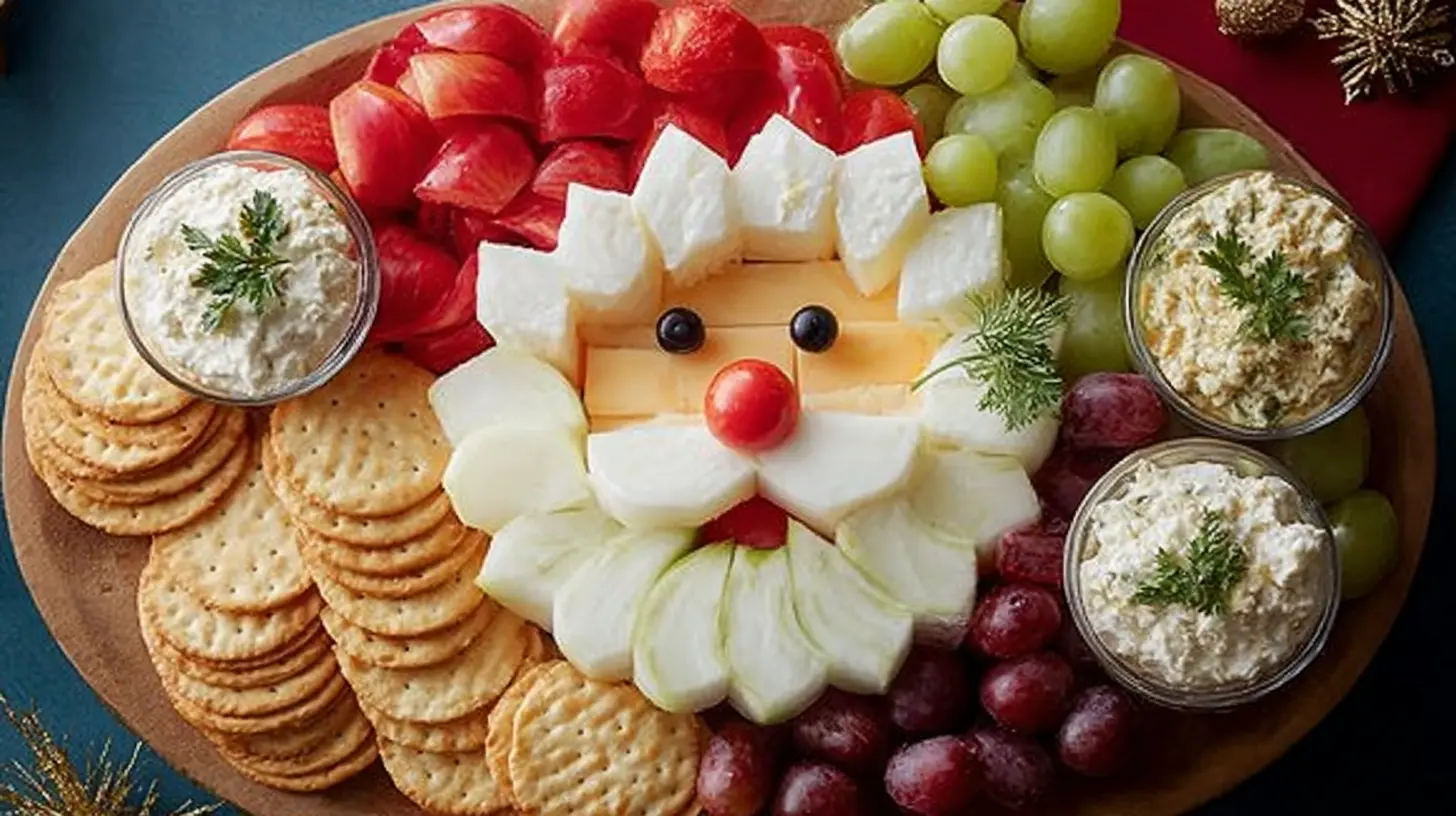
Creating this “Food art, Appetizer dips, Art carved” masterpiece is less about complex cooking and more about intelligent assembly and presentation. You’ll start with a creamy base, then layer in vibrant flavors and textures. The “art carved” aspect comes from thoughtfully arranging your components and perhaps a simple, elegant swirl or a delicate placement of a garnish. It’s about building a dip that looks as good as it tastes, with each step designed to build both flavor and visual appeal.
What You’ll Need
To embark on this artistic dip adventure, gather these items:
- Cream Cheese: One (8-ounce) block, softened to room temperature. This forms your luscious base.
- Sour Cream (or Greek Yogurt): 1/2 cup, for tang and creaminess.
- Mayonnaise: 1/4 cup, for richness.
- Fresh Herbs: 2 tablespoons finely chopped (e.g., chives, parsley, dill). A mix works wonders!
- Garlic: 1-2 cloves, minced (or 1/2 teaspoon garlic powder).
- Lemon Juice: 1 tablespoon, fresh-squeezed, to brighten the flavors.
- Salt and Black Pepper: To taste.
- For the “Art Carved” Toppings (choose a few vibrant options):
- Cherry Tomatoes: Halved or quartered.
- Cucumber: Thinly sliced or diced.
- Bell Pepper: Finely diced (red, yellow, or orange for color).
- Olives: Sliced (Kalamata or black olives).
- Red Onion: Very thinly sliced or finely minced.
- Radishes: Thinly sliced.
- Fresh Basil or Mint Leaves: Small, for garnish.
- Pomegranate Arils: For a burst of color and sweetness.
- Edible Flowers: Optional, for a truly artistic touch.
Directions to Follow
Let’s bring this edible art to life:
- Prepare the Base: In a medium bowl, combine the softened cream cheese, sour cream (or Greek yogurt), and mayonnaise. Using an electric mixer or a sturdy whisk, beat until smooth and creamy, ensuring no lumps remain.
- Flavor the Dip: Stir in the fresh chopped herbs, minced garlic, lemon juice, salt, and black pepper. Taste and adjust seasonings as needed. You want a well-balanced, flavorful base.
- Chill (Optional but Recommended): For best results, cover the dip and refrigerate for at least 30 minutes to allow the flavors to meld. This also helps the dip firm up slightly, making it easier to “carve” and decorate.
- Assemble Your Art: When ready to serve, spread the chilled dip onto a clean, flat serving platter or a shallow wide bowl. Use the back of a spoon or an offset spatula to create gentle swirls or a smooth, even surface – this is your canvas!
- Start Carving with Color: Begin artfully arranging your chosen toppings onto the dip. Think about contrasting colors, shapes, and textures. You might create concentric circles, diagonal lines, or an abstract mosaic. For example, a ring of sliced cucumbers around the edge, a scattering of cherry tomatoes, then a line of black olives, and a sprinkle of red onion.
- Garnish and Serve: Finish with a few strategically placed fresh basil leaves or a sprinkle of pomegranate arils for that final flourish. Serve immediately with a variety of dippers.
How to Serve It
The beauty of this “Food art, Appetizer dips, Art carved” creation truly shines in its presentation. Arrange it on a large, flat white platter to make the vibrant colors pop. Surround it with an array of dippers that complement its richness and allow the dip to be the star. Think about:
- Crisp Crudités: Carrot sticks, celery sticks, bell pepper strips, snap peas, radishes. Their crunch provides a wonderful textural contrast.
- Artisan Breads: Sliced baguette, pita bread (toasted or soft), or even gourmet crackers.
- Chips and Pretzels: For a more casual, yet still delicious, option.
Keeping Leftovers Fresh
Should you miraculously have any leftovers of this delightful dip, storing them properly is key.
- Storage: Gently cover the platter with plastic wrap or transfer any remaining dip to an airtight container. Refrigerate promptly within two hours.
- Shelf Life: The dip will stay fresh in the refrigerator for up to 3-4 days. However, the fresh “carved” toppings might lose some of their crispness over time.
- Reheating: This dip is best served chilled, so no reheating is necessary! If the toppings look a bit tired, you can always refresh them with a few new pieces before serving again.
- Freezing: Due to the cream cheese and fresh vegetable components, this dip does not freeze well. The texture would become grainy upon thawing.
Helpful Cooking Tips
- Room Temperature Cream Cheese: This is crucial! Softened cream cheese whips up smoothly, preventing lumps in your dip base.
- Taste as You Go: Always taste your dip before chilling and adjust the salt, pepper, and lemon juice. A little extra brightness from lemon can really elevate the flavors.
- Prep Ahead: You can make the dip base a day in advance and store it in the fridge. On the day of serving, simply spread it out and arrange your fresh toppings. This makes entertaining a breeze!
- Embrace Imperfection: Don’t stress too much about perfect symmetry when “carving” your art. Sometimes the most organic arrangements look the most stunning. Let your creativity flow!
- Consider a Theme: For holidays or specific events, tailor your toppings. Red and green for Christmas, shades of orange and black for Halloween, or edible flowers for a spring brunch.
Creative Twists
Want to put your own spin on this artistic dip? Here are a few ideas:
- Spicy Kick: Add a pinch of red pepper flakes to the dip base or finely diced jalapeños to your toppings for a vibrant zing.
- Mediterranean Flair: Incorporate crumbled feta cheese into the dip, and top with sun-dried tomatoes, Kalamata olives, and fresh oregano.
- Smoked Salmon Elegance: Fold flaked smoked salmon into the dip, and top with capers, red onion, and fresh dill.
- Vegan Version: Use a plant-based cream cheese and sour cream alternative. Ensure all other ingredients are vegan-friendly.
- Herb Garden Medley: Focus on a variety of fresh herbs (parsley, chives, dill, basil) layered beautifully on top for a true green masterpiece.
Common Questions
How long does it take to prepare this dip?
The active preparation time for the dip base is about 10-15 minutes. The “art carving” or arranging of toppings can take another 10-20 minutes, depending on your desired intricacy. So, plan for about 20-35 minutes total, plus optional chilling time.
Can I make the dip entirely ahead of time, including the toppings?
You can make the dip base up to 2 days in advance and store it covered in the refrigerator. However, for the freshest appearance and best texture, it’s best to assemble and arrange the “art carved” toppings just before serving. Some toppings, like cucumber or tomatoes, can release water over time, making the dip watery if left too long.
What kind of dippers work best with this dip?
A variety of dippers works wonderfully! Think about contrasting textures. Crunchy raw vegetables like carrots, celery, and bell peppers are excellent. Sliced baguette, pita bread (toasted or soft), or a selection of crackers also pair beautifully. For a richer option, consider sturdy potato chips or gourmet pita chips.

Classic "Art Carved" Creamy Herb Dip
Ingredients
Equipment
Method
- In a medium bowl, combine softened cream cheese, sour cream (or Greek yogurt), and mayonnaise.
- Beat the mixture with an electric mixer or whisk until smooth and creamy, ensuring there are no lumps.
- Stir in the fresh chopped herbs, minced garlic, lemon juice, salt, and black pepper.
- Taste and adjust seasonings to achieve a well-balanced flavor.
- Cover and refrigerate the dip for at least 30 minutes to allow flavors to meld and the dip to firm up slightly.
- Spread the chilled dip onto a clean, flat serving platter or shallow wide bowl.
- Use a spoon or spatula to create swirls or a smooth surface, forming your canvas.
- Artfully arrange your chosen toppings onto the dip, focusing on contrasting colors, shapes, and textures.
- Create patterns like concentric circles, diagonal lines, or an abstract mosaic using toppings such as sliced cucumbers, cherry tomatoes, olives, and red onion.
- Finish by strategically placing fresh basil leaves or sprinkling pomegranate arils for garnish.
- Serve immediately with a variety of dippers.