I still remember the first time I attempted to make a blooming onion at home. It was a messy, ambitious endeavor that ended with a delicious, albeit slightly lopsided, behemoth of an appetizer. While spectacular, it also felt like a commitment. That’s why these Bite-Sized Blooming Onions with Buttermilk Ranch Dip are an absolute game-changer. They deliver all the crispy, savory satisfaction of their larger cousin, but in a much more manageable (and shareable!) form. Perfect for when you want that wow factor without the deep-fryer dread, these little beauties quickly became a go-to for casual gatherings and even just a fun weekend snack.
Why You’ll Love This Dish
There’s something undeniably magical about a blooming onion, and shrinking it down into these bite-sized wonders only amplifies its appeal. You’ll adore this recipe because it takes a classic, crowd-pleasing appetizer and makes it incredibly accessible. No more wrestling with a giant onion or worrying about uneven cooking. These little bites cook up perfectly golden and crispy every time, offering that satisfying crunch followed by the sweet, tender onion within. Plus, while the classic buttermilk ranch is a winner, our four additional dip variations mean you can customize your flavor experience every time you make them. Whether you’re hosting a game day, need a fun party appetizer that’s guaranteed to disappear, or simply want to treat yourself to something special, these bite-sized blooming onions hit all the right notes.
> “I made these for a casual get-together and they were an instant hit! Everyone loved how easy they were to pick up, and the extra dip variations meant there was something for every palate. Definitely making these again!” – A Happy Home Cook
Preparing Your Bite-Sized Blooming Onions
Making these miniature marvels is a lot simpler than you might imagine. The process involves a couple of key stages: first, you’ll prepare your shallots (or small onions) by giving them a nice, even cut that allows them to “bloom.” Next comes the dredging, which is crucial for that signature crispy coating. You’ll dip them in a buttermilk mixture, then coat them generously in a seasoned flour blend. Finally, they get a quick fry until golden brown and delicious. While they’re crisping up, you can whisk together the easy classic buttermilk ranch and any of the exciting alternative dips you choose to serve alongside.
What You’ll Need
To whip up these amazing bite-sized blooming onions and their accompanying dips, gather these items:
For the Bite-Sized Blooming Onions:
- 1 large sweet onion or 4-5 small shallots (for blooming)
- 2 cups all-purpose flour
- 1 tablespoon paprika
- 1 teaspoon garlic powder
- 1 teaspoon onion powder
- 1/2 teaspoon cayenne pepper (optional, for a kick)
- 1 teaspoon salt
- 1/2 teaspoon black pepper
- 1 1/2 cups buttermilk
- 1 large egg
- Vegetable oil, for deep frying
For the Classic Buttermilk Ranch Dip:
- 1/2 cup buttermilk
- 1/2 cup mayonnaise
- 1 tablespoon fresh chives, minced
- 1 tablespoon fresh parsley, minced
- 1 teaspoon dried dill
- 1/2 teaspoon garlic powder
- 1/4 teaspoon onion powder
- Salt and black pepper to taste
For the 4 Dip Delights (Choose your favorites or make them all!):
- Spicy Sriracha Mayo:
- 1/2 cup mayonnaise
- 1-2 tablespoons sriracha (to taste)
- 1 teaspoon lime juice
- Smoky BBQ Ranch:
- 1/2 cup buttermilk ranch (from above)
- 2 tablespoons BBQ sauce
- 1/2 teaspoon smoked paprika
- Honey Mustard:
- 1/4 cup yellow mustard
- 1/4 cup honey
- 1 tablespoon mayonnaise
- 1 teaspoon apple cider vinegar
- Tangy Garlic Herb Dip:
- 1/2 cup sour cream
- 2 tablespoons fresh dill, chopped
- 1 tablespoon fresh chives, chopped
- 1 clove garlic, minced
- 1 teaspoon lemon juice
- Salt and pepper to taste
Directions to Follow
Here’s how to bring these delicious bite-sized blooming onions to life:
- Prepare the Onions/Shallots: If using a large onion, cut it into 1-inch thick rounds, then separate the rings. If using shallots, trim both ends, peel, and then make several cuts from the top almost to the root end, allowing them to fan out slightly without detaching.
- Set up Dredging Stations: In one shallow bowl, whisk together the flour, paprika, garlic powder, onion powder, cayenne pepper (if using), salt, and black pepper. In another shallow bowl, whisk together the buttermilk and egg until well combined.
- Coat the Onions: Dip each onion piece into the buttermilk mixture, ensuring it’s fully coated. Let excess drip off. Then, transfer to the seasoned flour mixture, coating thoroughly and pressing gently to ensure the flour adheres to all the “petals.” Shake off any excess flour. Place coated onions on a wire rack while you prepare the rest.
- Heat the Oil: In a large, heavy-bottomed pot or Dutch oven, heat about 2-3 inches of vegetable oil to 350°F (175°C). Use a thermometer to monitor the temperature.
- Fry the Onions: Carefully lower a few coated onion pieces into the hot oil, ensuring not to overcrowd the pot. Fry for 3-5 minutes, or until golden brown and crispy. Use a slotted spoon or spider to turn them occasionally for even cooking.
- Drain and Season: Once golden, remove the blooming onions from the oil and place them on a wire rack set over a paper towel-lined baking sheet to drain excess oil. Immediately sprinkle with a pinch of extra salt if desired. Repeat with the remaining onion pieces.
- Prepare the Dips: While the onions are frying or cooling slightly, prepare your dips. For the Classic Buttermilk Ranch, simply whisk all ingredients together. For the other variations, combine their respective ingredients in separate small bowls until smooth. Taste and adjust seasonings as needed.
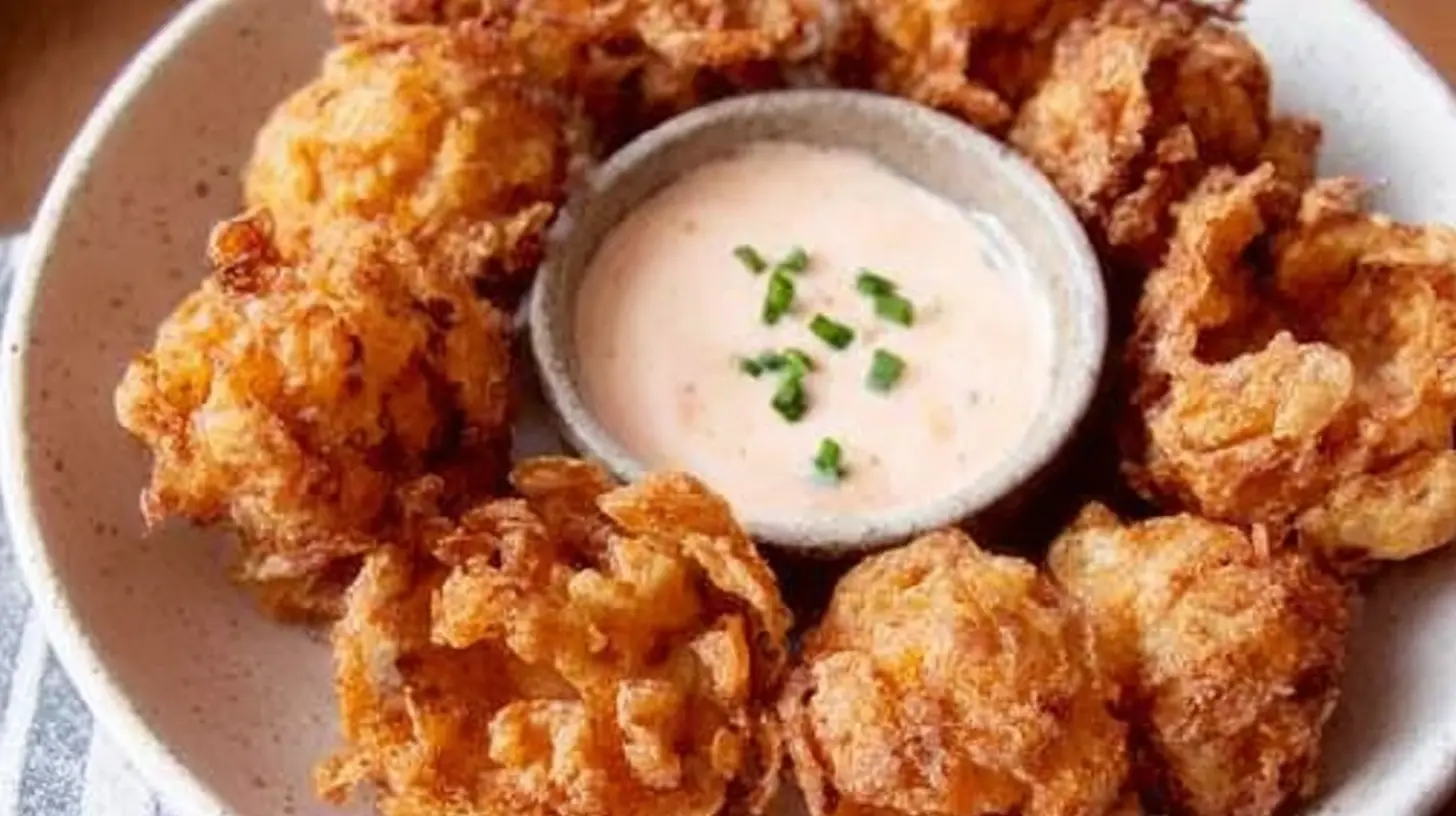
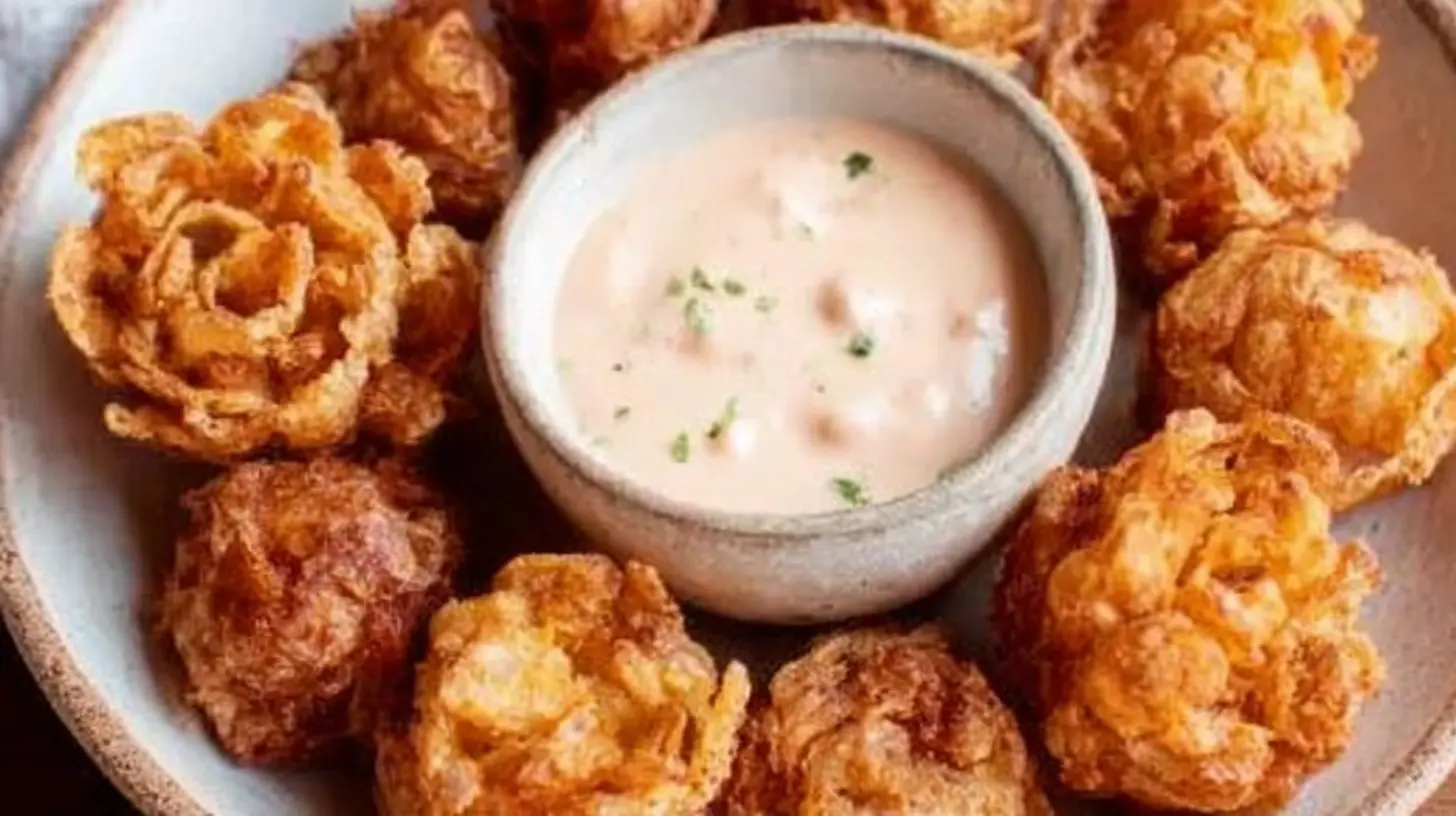
Best Ways to Enjoy It
These Bite-Sized Blooming Onions are best enjoyed fresh out of the fryer, while they’re still wonderfully warm and crispy. Arrange them artfully on a platter with small bowls of all four (or your chosen few!) dips strategically placed around them. This encourages guests to try different flavor combinations. They make a fantastic appetizer for any party, game day gathering, or even a fun movie night. For a more casual presentation, you can serve them in a large basket lined with parchment paper, making them easy to grab.
The Best Way to Save Extras
Honestly, these are so good, leftovers are a rarity! However, if you do find yourself with extra bite-sized blooming onions, they’re best stored in an airtight container in the refrigerator for up to 2 days. The crispness will diminish over time. For the dips, store them separately in individual airtight containers in the fridge for up to 3-4 days.
To reheat the blooming onions, avoid the microwave as it will make them soggy. The best method is to reheat them in an air fryer at 350°F (175°C) for 3-5 minutes, or in a preheated oven or toaster oven at 375°F (190°C) for 5-8 minutes, until re-crisped.
Helpful Cooking Tips
- Even Cuts: For the best “bloom” and even cooking, ensure your cuts on the shallots (or onion rings if using) are as even as possible. If making a large onion bloom, cut almost to the root but not all the way through. For these bite-sized versions, evenly sized rings or cuts in the shallots are key.
- Temperature Control: Maintaining the oil temperature at 350°F (175°C) is crucial. If the oil is too cool, the onions will absorb too much grease and be soggy. If it’s too hot, they’ll burn on the outside before cooking through. A deep-fry thermometer is your best friend here.
- Don’t Overcrowd: Fry in small batches. Overcrowding the pot will drop the oil temperature significantly, leading to less crispy results. Patience pays off!
- Season Immediately: A light sprinkle of salt right after they come out of the hot oil helps the seasoning stick and enhances their flavor.
- Dip Ahead: Dips can often be made a few hours or even a day in advance, allowing the flavors to meld and deepen beautifully.
Creative Twists
While the buttermilk ranch and our four delicious variations are fantastic, don’t stop there!
- Spice It Up: Add a pinch of chili powder or smoked paprika to your flour mixture for an extra layer of smoky heat in the coating itself.
- Cheese Please: A dusting of finely grated Parmesan cheese on the hot onions right after frying adds a lovely savory note.
- Herbaceous Hints: Incorporate finely chopped fresh herbs like thyme or rosemary into the flour mixture for an aromatic twist.
- Sweet Onion Variation: While sweet onions like Vidalia are excellent, try using different types of onions or even large banana shallots for subtle flavor variations.
- Different Dips: Experiment with other dip bases. A creamy blue cheese dip, a zesty cilantro-lime crema, or even a sweet chili sauce would all be delicious.
Common Questions
How do I prevent my blooming onions from being greasy?
The key to non-greasy blooming onions is maintaining the correct oil temperature (350°F or 175°C). If the oil isn’t hot enough, the coating won’t immediately seal, and the onion will absorb too much oil. Also, don’t overcrowd the pot, and drain them promptly on a wire rack set over paper towels after frying.
Can I bake or air fry these instead of deep frying?
While deep frying yields the crispiest, most authentic result, you can bake or air fry them as a healthier alternative. For baking, preheat your oven to 400°F (200°C), spray the coated onions liberally with cooking spray, and bake for 20-30 minutes, flipping halfway, until golden and crispy. For air frying, preheat to 375°F (190°C), spray with oil, and air fry for 10-15 minutes, shaking the basket occasionally, until golden. The texture won’t be identical to deep-fried, but they will still be delicious!
What’s the best way to cut the shallots for “blooming”?
For shallots or small onions, trim a small bit from the root end but leave enough intact to hold the petals together. Place the shallot cut-side down. Using a sharp knife, make 4-6 even cuts from the top down, almost to the root, but not through it. Then, repeat this process, making cuts between the previous ones, creating a starburst pattern. This allows the shallot to fan out beautifully after frying.
Can I prepare the coated onions in advance?
You can coat the onions a little in advance, but they are best fried immediately after coating for maximum crispness. If you absolutely need to prep ahead, you can coat them and refrigerate them on a wire rack for up to an hour, but expect a slightly less crisp result as the moisture from the onion can soften the coating. The dips can definitely be made a day in advance!
Classic Bite-Sized Blooming Onions with Buttermilk Ranch Dip
Ingredients
Equipment
Method
- Slice a large sweet onion into 1-inch rounds and separate the rings, or trim and peel several shallots, then make cuts almost to the root to allow them to fan out.
- Whisk together flour, paprika, garlic powder, onion powder, cayenne pepper (if using), salt, and black pepper in one bowl. In a separate bowl, whisk buttermilk and egg until combined.
- Dip each onion piece in the buttermilk mixture, then transfer to the seasoned flour, pressing to coat thoroughly. Shake off excess flour and place coated onions on a wire rack.
- Heat about 2-3 inches of vegetable oil to 350°F (175°C) in a large, heavy-bottomed pot or Dutch oven, using a thermometer to monitor the temperature.
- Carefully lower a few coated onion pieces into the hot oil, frying for 3-5 minutes until golden brown and crispy, turning occasionally for even cooking.
- Remove fried onions and place them on a wire rack over a paper towel-lined baking sheet to drain excess oil. Immediately sprinkle with extra salt if desired, and repeat with remaining onions.
- While onions fry or cool, whisk all ingredients for the Classic Buttermilk Ranch Dip together in a small bowl until smooth. Taste and adjust seasonings as needed.