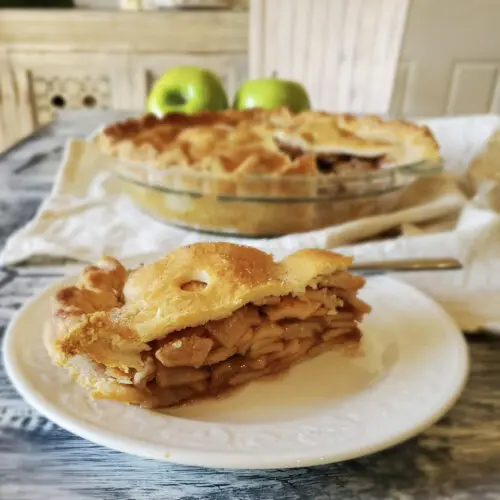
There’s something incredibly comforting about a warm slice of apple pie, especially one that tastes like it took hours to make but secretly came together in a flash. I remember my grandma, a wizard in the kitchen, always had a trick up her sleeve for making desserts seem effortless. This Apple Pie American recipe reminds me of her ingenious methods – simple ingredients, pure magic, and a result that makes everyone smile.
Why You’ll Love This Dish
This isn’t just any apple pie; it’s a testament to the idea that sometimes less truly is more. If you’re short on time, ingredients, or just energy, this recipe is your new best friend. It delivers all the classic, comforting apple pie flavors you crave without the fuss. It’s perfect for a weeknight dessert, a last-minute potluck contribution, or simply when you want to treat yourself to something sweet without spending your entire evening baking.
> “I was skeptical about a 3-ingredient pie, but wow! This Apple Pie American recipe is a game-changer. So easy and tastes fantastic – my family devoured it!” – Happy Home Baker
The Cooking Process Explained
Making this Apple Pie American is surprisingly straightforward. You’ll essentially be combining your star ingredients – apples, a sweet element, and your crust – then baking until golden and bubbly. The beauty of this recipe lies in its simplicity, proving that you don’t need a pantry full of exotic items to create a truly delicious dessert.
What You’ll Need
Gathering your items for this Apple Pie American is a breeze since we’re working with a minimalist ingredient list.
- Apples: About 6 medium-sized baking apples. Granny Smiths are fantastic for their tartness, which balances the sweetness beautifully, but Honeycrisp or Fuji also work wonderfully for a sweeter pie.
- Sweetener: 1 cup of apple pie filling or apple butter. This is where the “magic” happens, as it already contains the spices and sweetness needed.
- Pie Crusts: 1 package (2 sheets) refrigerated pie crusts. Using pre-made crusts is the ultimate shortcut here!
Directions to Follow
Here’s how to bring your effortless Apple Pie American to life:
- Preheat and Prep: Preheat your oven to 425°F (220°C). Unroll one pie crust and gently fit it into a 9-inch pie plate. Trim any excess dough, leaving about a 1/2-inch overhang.
- Apple Mix: Peel, core, and thinly slice your apples. In a large bowl, combine the sliced apples with the apple pie filling or apple butter, tossing gently to ensure the apples are well coated.
- Fill the Crust: Pour the apple mixture into the prepared pie crust, mounding it slightly in the center.
- Top it Off: Unroll the second pie crust. You can either place it directly over the filling, crimping the edges to seal, or cut it into strips to create a lattice top for a more decorative look (if you’re feeling fancy!). Trim and crimp the edges of both crusts together. Cut a few slits in the top crust (if not making a lattice) to allow steam to escape.
- Bake to Perfection: Place the pie on a baking sheet to catch any potential drips. Bake for 15 minutes at 425°F, then reduce the oven temperature to 375°F (190°C) and continue baking for another 35-45 minutes, or until the crust is golden brown and the filling is bubbly. If the crust starts to brown too quickly, loosely cover the edges with aluminum foil.
- Cool Down: Let the pie cool completely on a wire rack for at least 2-3 hours before slicing and serving. This allows the filling to set properly.
Best Ways to Enjoy It
This Apple Pie American is utterly delicious on its own, but a scoop of vanilla bean ice cream melting over a warm slice is pure heaven. A dollop of freshly whipped cream also makes for a delightful pairing. For an extra touch of coziness, consider a sprinkle of cinnamon or a light drizzle of caramel sauce before serving. It’s the perfect end to any meal, no matter how simple or elaborate.
Keeping Leftovers Fresh
To store your Apple Pie American, cover it loosely with plastic wrap or aluminum foil. It can be kept at room temperature for up to 2 days. For longer storage, refrigerate for up to 4-5 days. To reheat, you can warm individual slices in the microwave for 30-60 seconds, or for a crispier crust, place the entire pie (or slices) in a preheated oven at 350°F (175°C) for 10-15 minutes until warmed through.
Helpful Cooking Tips
- Apple Choice Matters: While any apple will work, firmer apples like Granny Smith, Honeycrisp, or Fuji hold their shape better during baking and contribute more texture to the pie.
- Don’t Rush the Cooling: This is crucial! Letting the pie cool completely allows the filling to set up, preventing a runny, messy slice. Patience is a virtue here.
- Egg Wash for Shine: For an extra golden and shiny crust, lightly brush the top crust with an egg wash (one egg whisked with a tablespoon of water) before baking.
Creative Twists
Want to play around with this minimalist masterpiece? Here are a few ideas:
- Spice It Up: If your pre-made pie filling is a bit bland, bolster it with an extra teaspoon of cinnamon, a pinch of nutmeg, or even a dash of ground cloves.
- Nutty Crunch: Add 1/2 cup of chopped walnuts or pecans to the apple filling for an added layer of texture and flavor.
- Cheese Please: For a classic American pairing, serve a slice of sharp cheddar cheese alongside your warm apple pie.
- Crumb Topping: Instead of a full top crust, consider a simple streusel topping made from flour, sugar, butter, and a pinch of cinnamon for a different texture.
Your Questions Answered
Can I use fresh apples and make my own filling from scratch instead of canned?
A: Absolutely! This recipe focuses on simplicity, but if you prefer, you can peel, core, and slice about 6-8 medium apples (around 6 cups). Then, mix them with 1/2 cup sugar, 1/4 cup flour (or 2 tbsp cornstarch), 1 teaspoon cinnamon, 1/2 teaspoon nutmeg, and a tablespoon of lemon juice.
Why do I need to cool the pie for so long?
A: Cooling the pie allows the starches in the apple filling to fully gel and set. If you cut into a hot pie, the filling will likely be runny and spill out, making for a soupy slice. A well-cooled pie yields neat, beautiful slices.
Can I freeze this apple pie?
A: Yes, you can! Bake the pie completely and let it cool. Once fully cooled, wrap it tightly in plastic wrap and then in aluminum foil. It can be frozen for up to 3-4 months. Thaw in the refrigerator overnight, then reheat in a 350°F (175°C) oven until warmed through.
Effortless Apple Pie American
Ingredients
Equipment
Method
- Preheat oven to 425°F (220°C). Unroll one pie crust and fit it into a 9-inch pie plate, trimming excess dough and leaving a 1/2-inch overhang.
- Peel, core, and thinly slice apples, then combine them with apple pie filling or apple butter in a large bowl, ensuring they are well coated.
- Pour the apple mixture into the prepared pie crust, mounding it slightly in the center.
- Unroll the second pie crust and place it over the filling, crimping the edges to seal or cutting into strips for a lattice top; trim and crimp both crusts together. Cut a few slits in the top crust for steam, or brush with an egg wash for a golden, shiny crust.
- Place the pie on a baking sheet to catch drips and bake for 15 minutes at 425°F (220°C).
- Reduce oven temperature to 375°F (190°C) and bake for 35-45 minutes more, or until golden brown and bubbly; cover edges with foil if browning too quickly.
- Cool the pie completely on a wire rack for 2-3 hours to allow the filling to set properly before slicing and serving.